
How to make icc profile with XcolorRIP.
- Dec 29, 2022
- 4 min read
How to make icc profile, CMS works. this document based on "How to make icc profile" of XcolorRIP manual. this is casual version but at least you want to learn about CMS works and RIP software and ICC Profiles.
Why CMS, Why RIP software
Introducing with 4 questions and answer.
1. Why always print output is different with it’s original image file?
2. What is RIP software ?
3. What is ICC Profile and CMS works ?
4. Why it’s so important applying proper ICC profile for your printer ?
1. Why always print output is different with it’s original image file?
It’s because different status of printing environment makes different output. Printer – resolution, ink kind, media kind all affects output image color.
2. What is RIP software ?
RIP (Raster Image Processing) software is similar to windows printer driver, various data change to raster image and change printer command so it can print data. Large format printer always need RIP software. Easy, productive, and support CMS makes good quality output.
3. What is ICC Profile and CMS works .
CMS (Color Matching System) is process of making icc profile and density curve for specific printer and ink and media environment. ICC profile is some kind of color table by CIELab unit. That enable print output can print similar color with adequate icc profile applied. CMS Works making icc profile for special environment and result is icc profile and density curve file.
4. Why it’s so important applying proper ICC Profile for your printer.
Maintain good colors when printing , that’s really important for printing shop. It’s because customers wants good quality output same as original image. And if some environment change then must need new CMS work and new icc profile needed. For example if printer is changed then you need new settings and new CMS work needed, just ink changed you also need CMS works . so maintain good colors , give customers belief of good quality printing output . that’s the main key point of printing shop’s competitiveness.
CMS work process
Now explain how to make ICC Profile . CMS works.
Process list
1. Print Density chart .
2. Make Ink Limit and density curve file.
3. Color balance check and decide total ink limit.
4. Apply Density curve and print calibration chart .
5. Read calibration chart from Monaco .
6. Generate ICC Profile ( with options)
7. Apply to XcolorRIP.
Start main process detail explanation.
1. Prepare for CMS works check points. A. Check if printer head quality is good ( if head is clogging then CMS works can not make good results. So maintain good condition needed). B. Prepare good quality media, ink, if media can not make good color or print output is not so good then may be you need to use another good quality media. C. About china printers, sometimes it need to adjust waveform for good quality output , if output density is not enough then it’s not available to make ICC profile, so apply good output waveform need. (it can apply in firmware program like PrintExp. ) This is Hosson soft board firmware. another firmware program have different way of support . for SY board - Advanced setup - Voltage type - change this make density and dot size change. |  |
2. Print Density Chart with file in this directory. (Linear_Eyeone.eps) with all default option, No ICC profile, Density curve initallize. (all 100% no curve). |   |
3. Read Density chart using Density chart read. – Jobsetting-Setting-DensityCurve-[Read Density Chart] and save it. | 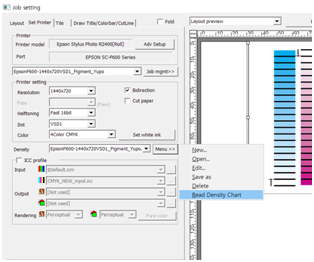   |
4. edit saved density curve file and Check if ink limit is OK. If density curve is like this , that need ink limit apply apply ink limit and print density chart again. Plz use another density curve file as apply ink limit. All default just apply ink limit and print with this density curve . Each Ink limit you must adjust, and also you must adjust color balance. The best color balance, each color curve similar each other. You can adjust each ink limit and make curves similar. While make good results adjust ink limit and print chart and read again. When chart is good, then save final density curve and also modify edit curve and apply each ink limit as you apply with another file. Cyan ink curve top right, all 4 points already reach top so it’s meaningless so limit is 100% -5%x4 = 20% 100-20 =80%. Magenta Ink also 4 points reach the top, so limit is 80% . Yellow ink 6 points reach the top, so limit is 70% . Black ink 3 points reach the top, so limit is 85%. And print with new another density curve file. And just change ink limit as above. After all process is right, then save current read density curve, and edit it again and apply ink limit and save again. | You can choose CMYK each ink limit like this.
    |
Also apply total ink limit. You can check with this “color_40_CMYK TEST.eps” file with current density curve file applied. You can check CMY chart, if it’s heavy or not. Adjust total ink limit and print again . Also you can check CMY color balance with this chart. |  |
5. Now apply density curve and still do not apply icc profile and print calibration chart for making ICC Profile now we are using IT873 chart. If media is not large enough for 4charts printing at once, then use tif 1,2,3,4 for 4 sets of A4 size. 6. Printing calibration chart well then now start read calibration chart use Monaco | 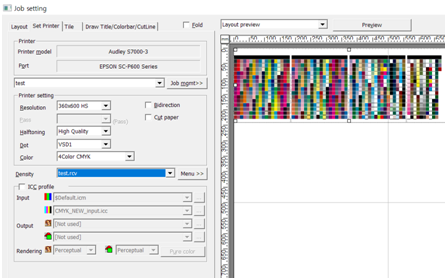 |
7. Monaco Program execute. – details of Monaco program plz contact us. |  |
 |  |
 |  |
  |  |
after all read chart then next you can check options. In [Ink Control Settings] as select [Custom] and Type-GCR, Level – Medium. Intelligent Black checked. Maximum Ink do not change. All options selected clearly then Next (right arrow). then Generate ICC profile. And [Generate ICC Profile] click then you can select icc profile save position, and profile name apply. Then start generating ICC profile. |  |
8. Now apply to XcolorRIP. Copy icc profile generated , to Xcolorrip , color\printer name\ directory.
9. Setting current density and resolution and new copied icc profile select then save JobSetting name. so then now when select this jobsetting then you always find proper setting resolution, density , and icc profile will follow.
10. Test some image files and if you need more adjustment then you can change density ink limit and more dark or lighter,
11. One more thing you can select point is Input ICC Profile. Especially for CYMK input, there are many input icc profiles. When you change input icc profile then colors will be change to you must understand this. Generally iput icc applied when you make image files. (generally Photoshop using “JapancoatedSwop” and CorelDraw using “HighendSWOP”, and so on. So follow general icc setting is important to make good quality output.
12. But some cases input icc also change output image as you wish. So some special input icc profile (especially CMYK input). I recommend use this in some cases.
JapancoatedSWOP | general case, standard |
XcolorCMYKContrast.icm AudleyCMYKContrast.icm | When more vivid color needed, this input icc make effect for bright color, and more contrast that makes image more vivid |
CoatedFOGRA39.icc | Its not vivid but if you want some strong dark enough color then use this. |
HIGH_END_SWOP.ICM | When you are using CorelDraw and using XcolorRIP and find color is not so good, then use this input icc, this is because default input icc of CorelDraw using HighEndSWOP so may be change color. So try with this. |
CMYKinput_plus10saturation.icm CMYKinput_plus20saturation.icm CMYKinput_plus30saturation.icm CMYKinput_fullBlack.icm | Generally do not use this but if you want to make more vivid color for solid Red or Blue.. then use this make affects. But generally may be this icc profile can not make good color so do not recommend this. Just for solid dark colors . |
One more thing you must remember point about Color setting.
You can select rendering method.
You can find 4 rendering intents. A rendering intent is a method of converting colours from one ICC profile to another. They deal with problems of converting from one profile to another, as there will be colours that are in gamut of the source profile but out of gamut of the destination. In this situation the out of gamut colors. it’s not easy to understand. If you want more detail plz visit this link and you can find more deep information. |  |
Actually you can use “Perceptual” rendering as Photo. Like face or landscaope or anything that’s photo.
On the contrary, “Relative Colorimetric” used when data is Logo , this rendering makes similar color as same, and make darker output. So if you print Logo data, not photo then this rendering works good.
One more thing.
Rendering you can apply Vector and Raster (image) differently. EPS file have Vector and Raster data also so you can apply rendering differently, but some cases it makes some output error, like Text have shadow effect then Text is Vector and Shadow must Raster so if you use Vector as “Relative Colorimetric” and Raster as “Perceptual” then these two colors goes different that makes output weird .
So better way is make 2 Jobsettings as for Photo, and as for Logo and use it differently.
You must remember if you apply photo image “Relative Colorimetric” then detail photo will blur. So then use “Perceptual” always.
More options "Pure color"

You can apply this colors do not apply icc profile and use pure color ( just density apply).
So that makes color more vivid and pure. just for these (C, M, Y, K, R, G, B) colors.
Detail explained how to make icc profile document. Plz check attached document file.
this download link :
if you have any question about CMS work then plz contact us. SNS : wechat id : papafrog77 / whatsapp +821020075860


Comments